Error handling conventions in C programming languages

EDIT February 22, 2014: You’ll find the code for the functions mentioned in this post (and related ones) in TECommon

Programmers have many options available to them when it comes to error handling.  A very common convention among C programmers is to make a function return a non-zero value if an error has occurred.  This post is about what to do with that non-zero value.

Let’s start with a simple example:

    1 OSStatus initKeychainAccess()
    2 {
    3     OSStatus err;
    4 
    5     err = SecKeychainSetUserInteractionAllowed(TRUE);
    6 
    7     if ( err ) {
    8         log_err("couldn’t enable keychain user interaction");
    9         return err;
   10     }
   11 
   12     err = SecKeychainUnlock(gKeychain, 0, NULL, FALSE);
   13 
   14     if ( err ) {
   15         log_err("couldn’t unlock keychain");
   16     }
   17     else {
   18         err = SecKeychainAddCallback(MyKeychainCallback, kSecEveryEventMask, NULL);
   19         if ( err ) {
   20             log_err("couldn’t set callback for keychain");
   21         }
   22     }
   23 
   24     if ( err == 0 ) {
   25         doThatFancyThingYouDo();
   26     }
   27 
   28     return err;
   29 }

This example demonstrates three common error handling techniques that I’ve encountered in the wild:

  1. Return immediately (line 9)
  2. Building nested if-else clauses (lines 14-22)
  3. Repeatedly checking error status (line 24)

This is just a simple, short example, but these error checking patterns can really add up in more complicated code, making it unwieldy and unnecessarily complex, not to mention a pain to maintain and debug. There’s also the nuisance of having to write a custom error message for each situation as well, and most of the time developers tend to just avoid doing that altogether, making it difficult to troubleshoot problems when they occur on a remote system.

To get around these problems developers often use macro’s with goto’s. Here’s one technique that I’ve seen:

    1 OSStatus initKeychainAccess()
    2 {
    3     OSStatus err;
    4     err = SecKeychainSetUserInteractionAllowed(TRUE);
    5     require_noerr(err, fail_label);
    6     err = SecKeychainUnlock(gKeychain, 0, NULL, FALSE);
    7     require_noerr(err, fail_label);
    8     err = SecKeychainAddCallback(MyKeychainCallback, kSecEveryEventMask, NULL);
    9     require_noerr(err, fail_label);
   10     doThatFancyThingYouDo();
   11 fail_label:
   12     return err;
   13 }

Now that’s certainly an improvement, we went from 29 lines down to 13, and the code is much more readable. That’s pretty good, but I think we can do better, here’s my version:

    1 OSStatus initKeychainAccess()
    2 {
    3     OSStatus err;
    4     DO_FAILABLE(err, SecKeychainSetUserInteractionAllowed, TRUE);
    5     DO_FAILABLE(err, SecKeychainUnlock, gKeychain, 0, NULL, FALSE);
    6     DO_FAILABLE(err, SecKeychainAddCallback, MyKeychainCallback, kSecEveryEventMask, NULL);
    7     doThatFancyThingYouDo();
    8 fail_label:
    9     return err;
   10 }

In the event of an error, you’ll get all of the important information that you need to pinpoint exactly what happened: the function that failed, the error code, and the line number. Here are the definitions for DO_FAILABLE and a few variants thereof:

#define DO_FAILABLE(_errVar, _func, args...) do { \
    if ( (_errVar = _func(args)) != 0 ) { \
        log_err(#_func ":%d returned: %d\n", __LINE__, (int)_errVar); \
        goto fail_label; \
    } \
} while (0)

// useful when the error code isn't the return value
// ex: DO_FAILABLE_SUB(err, errno, setuid, getuid());
#define DO_FAILABLE_SUB(_errVar, _subst, _func, args...) do { \
    if ( (_errVar = _func(args)) != 0 ) { \
        _errVar = _subst; \
        log_err(#_func ":%d resulted in: %d\n", __LINE__, (int)_errVar); \
        goto fail_label; \
    } \
} while (0)

// just note that an error occurred, but don't do anything about it
#define FAILABLE(_errVar, _func, args...) do { \
    if ( (_errVar = _func(args)) != 0 ) { \
        log_err(#_func ":%d returned: %d\n", __LINE__, (int)_errVar); \
    } \
} while (0)

This cuts down on the number of lines of code by implicitly assuming that fail_label exists (more often than not, a single fail label is enough). Also note the cast to int, this is necessary because sometimes your error value might be stored in a type that will cause gcc to give a warning (e.g. if you have it enabled via -Wall) because of a mismatch between the type and the %d in the printf statement.

Another nice thing about these macros is that they’re very easy to adopt, oftentimes you could easily throw them into your code via a regex find&replace. You simply prepend DO_FAILABLE( in front of the error assignment, convert the equals sign into a comma, and replace the first open parenthesis in the function call with another comma. Then add a fail_label somewhere.

The real fun comes afterward, when you get to delete hundreds of lines of unnecessary error-checking code. 🙂
Fix annoying trial ending notifications

A user recently brought to my attention that Espionage would notify them that the trial was expiring in 3 days every minute.  If you ran into this problem please accept my apologies, it’s certainly not there by design.  The download for 1.1.2 has been “silently” updated with a fix for this.

If you’re affected by this simply do the following:

  1. Turn off the Espionage’s helper from the General Preferences.
  2. Re-download Espionage.
  3. Quit and trash the old copy, replacing it with the new one.
  4. Open the new copy and start the helper from the preferences.

That’s it!  No more repeating notifications. Thanks go to Matt for pointing this one out!

Espionage 1.1.2 Released!

Espionage 1.1.2 is here! It’s first and foremost a huge stability update, but it also boasts 3 new features:

  • NEW: support for encrypting folders over a network mount
  • NEW: ability to run Espionage on multiple user accounts
  • NEW: you can now rename a folder using “Locate Missing Folder…”
  • FIXED: updated ispyd to remove unnecessary logging
  • FIXED: “Locate Missing Item” menu item in File menu grayed out properly
  • FIXED: some issues with non-ASCII characters
  • FIXED: moving folder could cause Espionage to lose track of its password
  • FIXED: potential hang when locking a non-encrypted folder w/simultaneous access
  • IMPROVED: more informative logging
  • IMPROVED: restoring folders copies over extended attributes
  • IMPROVED: upon restore volume is made visible to improve robustness in case of error
  • IMPROVED: upon restore image is appended with date in case of existing image in parent
  • IMPROVED: one-shot notification explaining how to securely delete original folder
  • IMPROVED: uninstaller now deletes preferences too, resulting in a truly complete uninstall
  • IMPROVED: added instructions on how to fix error -1712
  • IMPROVED: error handling in installer
  • IMPROVED: Espionage won’t give annoying redundant error if helper fails during operation
  • IMPROVED: more safety checks on what can be encrypted and what can’t

Logitech Control Center (Updated)

UPDATE: It turns out that Espionage *is* compatible with Logitech, but only the latest version (2.7 as of this writing). Espionage version 2.1 and later will check for this and will not complain if it detects that you have LCC 2.7 or later installed.

We’ve received two reports so far of Espionage starting up but not showing the main window, and in both cases we tracked the problem down to Logitech’s Control Center (LCC), which is notorious in its reputation for breaking various software.

The problem is that LCC installs Unsanity’s Application Enhancer to run their “LCC Scroll Enhancer”.  This piece of software will load into just about every application you run and mess with its code, so it’s not surprising that this has given many developer’s headaches.

If you experience these symptoms the best thing to do for now is to uninstall LCC and consider one of the many other solutions out there. I personally recommend USB Overdrive, it works great with my Logitech keyboard & Microsoft mouse.

I used to use LCC myself as I have a Logitech keyboard that I rather like but have since uninstalled it because of the problems I experienced with it.  I don’t remember if it has a convenient uninstaller with it (something that I made sure Espionage had), but once you’ve uninstalled it check to make sure the following files do not exist on your system:

/Library/InputManagers/LCC Scroll Enhancer Loader
/Library/ScriptingAdditions/LCC Scroll Enhancer

If they do just move them to the trash and restart your computer. After that Espionage should load up just fine. We plan on investigating this in more detail to see if we can somehow make Espionage work with LCC, but until then this is probably the best solution, as it’s likely it could fix other “broken” applications on your system.

Thanks For A Great Launch!

Well, it’s been a week and a day since Espionage was announced to the world.

Since then Espionage has been featured all over the web, on sites like lifehacker, Macworld, MacUser, MacNN, The Apple Blog, and others.

I feel honored that so many people are as excited about Espionage as I am.  I have spent over a year developing it on my own, and now the fruits of that effort are finally available to everyone.  For the first time in history, you can now encrypt individual folders on the Mac.

Why is this a big deal?

I’ve heard lots of different answers to this question, but for me, it started with the simple desire to encrypt my email, and just my email.  I didn’t want my laptop to slow to a crawl and lose battery life from the solution that Apple provided, so I set about creating my own.

Espionage has given me an outlet to unleash my creative potential as a developer, and since launching the product and Tao Effect it has really taken off.  I’m now going to work on Espionage full time, to make it better and better, while keeping it affordable.  The launch is over now, so the price is now set at a competitive $19.95, even though no other application can do what it does (we’re working on volume pricing, for now address inquiries to ).

I’d like to thank all of you early adopters out there for your trust and support, and I want you to know that because of your support you are helping ensure Espionage’s future, so thank you for joining me on this journey, there are exciting features on the horizon!

😉

– Greg Slepak

Espionage 1.1.1 Released!

I’m happy to announce the first update to Espionage! Here’s what’s new:

  • FIXED: “Open Helper Log” changed to “Open System Log”. Look for more improvements later.
  • FIXED: Attempts to encrypt ~/foo and ~/foo3 work now (thanks Roger!)
  • FIXED: [_NSStateMarker filePath] error should no longer happen.
  • FIXED: Can no longer uninstall if locked
  • IMPROVED: Won’t let user encrypt parent folder of Espionage’s database for safety
  • IMPROVED: Updated encryption doc to mention that you can securely delete the original folder using the Finder.
  • IMPROVED: more informative logging (don’t worry, we make sure not to log too much)
  • IMPROVED: Folder capacity is now at least 10 times the folder size. Automatic resizing coming soon.
  • IMPROVED: Espionage now intelligently handles folders that weren’t locked properly

Probably the most noteworthy change is the last one, let’s examine what it means in detail.

In this screencast we show how to encrypt your email using Espionage.  Let’s look at the dirty details of what happened there:

  1. Espionage turned the Mail folder into an encrypted disk image called .Mail.sparseimage
  2. It then moved the Mail folder into the Trash so that the user could either back it up or securely delete it using the Finder
  3. In its place another (specially marked) folder was created with the same name and the image was placed inside it.
  4. The folder is now “locked.”

When the folder is unlocked here’s what happens:

  1. Espionage moves the image out of the Mail folder into the parent directory and mounts it in /Volumes/EspionageMounts/<some number>
  2. The “Mail folder” is deleted and a link is created in its place pointing to the mount
  3. The folder is now “unlocked.”

So.  What happens if suddenly the computer crashes, or if you had an unlocked folder on an external drive and unmounted it before re-locking it, or if you backup your computer right now and at some point in the future restore it to this point?

Previously, Espionage would see that it can’t find its specially marked folder (which is how it knows that it can delete the folder to create the link) and would give an error.  In 1.1.1, Espionage will try and restore the folder back to its locked state by re-creating the Mail folder, marking it as its own, and moving the image back into it.

Now the only time it will fail in this situation is if there is already a folder called “Mail” there and it isn’t marked as belonging to Espionage.  Espionage tries to be very safe with your files, so it won’t delete a folder that doesn’t belong to it.  If this happens you’ll get an error that says something along the lines of “Broken encrypted folder detected but folder is not under our control.”  You can fix this situation by trashing the folder yourself and re-enabling it in Espionage.

This update should improve Espionage’s stability, and pave the way for exciting new features in future versions, so keep an eye out for those!

Espionage, Time Machine, and the Future

Update (9/20/09): This post is slightly out-of-date now, if you’re looking for instructions on how to use Espionage with Time Machine, the best place to look is in the backup section of its manual. Espionage’s manual is accessible online *and* within Espionage itself.

This topic is covered extensively in the Help documentation that comes with Espionage, but from the amount of email I’m getting it appears it deserves a blog post as well.

While designing Espionage, I realized that its ability to intercept any access to folders could lead to problems with backup applications, since it would be quite annoying to the user if the password prompt appeared any time say, when Time Machine tried to backup their folder.

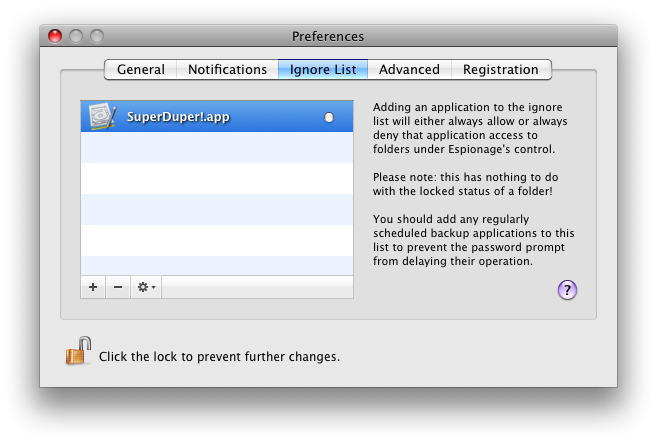
For this reason Espionage was given an ignorelist.  Now whenever Espionage detected that an application on the ignore list was trying to access one of its protected folders, it would automatically allow or deny that application access without prompting the user (depending on whether the application was “whitlisted” or “blacklisted”, respectively).

By default Espionage has rules for Spotlight, AppleFileServer, and Time Machine.  You can add other applications to the ignore list either by adding them manually in the preferences, or directly from the password prompt.  Here’s what the ignore list looks like with SuperDuper! whitelisted:

Keep in mind, however, that when “granting an application access” to the folder does not actually mean it can read the contents of that “folder.”  This gets us into the hairy details of how Espionage works.

When a folder is encrypted by Espionage, it takes the contents of that folder puts it into a sparse disk image*.  This disk image will be named “.<foldername>.sparseimage”, and is placed into the folder.  The original folder, meanwhile, is placed into the Trash where the user can back it up, securely delete it using the Finder, or do whatever they please with it.  When the folder is unlocked, the disk image is moved into the parent folder, is mounted in a special location, and a link is created in place of the folder pointing to that mount.

Thus, when you backup an encrypted folder, you’re really backing up an encrypted disk image.

Currently, restoring from a backup to an *unlocked* state will confuse Espionage, but your data will still be safe, just hidden.  We’ll be releasing a maintenance build very soon to address this issue and some others.  I suspect that this situation is rare enough though that we’ll fix the problem before anyone runs into it.  If, between now and the next release you do end up having to restore from a backup that has a folder in the unlocked state and run into problems, just contact support and we’ll help you out in a jiff!

Also, because we’re currently using sparse disk images, making a change to the folder’s contents will cause Time Machine to backup the entire folder.  Yes, we realize this is annoying for those of you using Time Machine, and you can expect sparsebundle support to come soon to solve this problem.

* Note: If the folder is less than 2048 MB (or whatever the value of “Minimum Image Capacity” is), the capacity will be set to that, otherwise the capacity will be 10x the folder size.  You can edit the default capacity, as well as the default filesystem of disk images from the Advanced preferences.  Look for major improvements related to this in a future release…

What is this “iSpy” anyway?

See this post if you are interested in licensing iSpy.

iSpy is the magic behind Espionage’s amazing capabilities.

Despite its sinister sounding name, iSpy has absolutely nothing to do with “spyware” whatsoever.  iSpy gets its name from its ability to spy on events in the filesystem.

What does that mean?

Well, let’s look at how Espionage uses iSpy.  Espionage asks iSpy to send it events whenever any of the folders that it’s monitoring are accessed.  So when a user double-clicks on a folder under Espionage’s protection, iSpy sends Espionage an event.  As far as I’m aware, it is currently the only system on the Mac OS X platform that has this capability.

But the magic doesn’t stop there.  iSpy can also moderate file operations. This is how Espionage’s non-encrypted protection works.

P.S. Tao Effect (and you can consider this a company philosophy) will never include any form of spyware in any of its applications.

The Failure of “Vaults”

This post comes straight out of Espionage’s built-in help.

Before Espionage came onto the scene, it was very difficult to securely protect individual folders. The ability to put a password on a folder wasn’t even possible. Because of Espionage, this has all changed.

The typical method of protecting data on Mac OS X has been the use of “vaults”, which are really just encrypted files called disk images that are mounted in a specific location.

Disk images have many limitations. While they allow you to securely protect data, they are difficult to use, and can’t be used to seamlessly protect application data on an individual basis, that is, until now.

Some applications have tried to make disk images easier to use by referring to them as “vaults” and giving you a “one-click” method for creating them. But the problem with this approach is that you still have to use a separate application to manage the vault, and you can’t use it to protect important application data (like email).

Apple’s FileVault has a single vault that does protect application data, but it does this by encrypting your entire home folder. This “all or nothing” approach can slow down your computer and drain battery life because the process of encryption is expensive.

Your home folder has a lot of data stored inside of it. Application data, movies, music, etc. Most of it doesn’t need encryption. Accessing this data, without encryption, is slow enough already because of the slow speed of hard disks, so why make it over 3x slower unnecessarily?

Espionage to the Rescue!

So we thought, “Why not simply have encrypted folders?”

That would solve all of those problems! Espionage lets you encrypt only the data that you want encrypted, and makes it easy to manage your encrypted data by doing all of the dirty work for you!

You don’t have to worry about disk images, or “vaults”. Just drag a folder onto Espionage and it takes care of the rest. From then on you can simply double-click on that folder and a password prompt will appear asking for that folder’s password. Once you’re done using the data that’s inside of
it, just right-click on it and select “Lock” from the menu to lock it. And protecting application data has never been easier.

Benchmarks

Encrypting data comes at the price of reduced performance when accessing that data. This is because the process of encryption and decryption results in data being passed through complex algorithms that transform the data into unreadable and readable states, respectively. Running these algorithms takes time, and makes the CPU work harder, all of which can impact performance (and battery life for laptop users) when accessing that data.

This is why Espionage gives you fine-grained control over what gets encrypted. 🙂

OK, but how much?

To answer this question we ran the standard suite of benchmarks using Intech’s QuickBench software with default settings on a Macbook Pro laptop with the following specifications: Continue reading