- NEW: Evernote application template (be sure to quit the Elephant in the menubar before encrypting!)
- NEW: Instructions for Microsoft Outlook
- IMPROVED: iCal template associates Mail with the Calendars folder now because of Todos
- IMPROVED: Outdated backups of sparseimages (when folder changed to sparsebundle) are deleted (and vice versa)
- FIXED: Rare situation where Espionage’s main window wouldn’t show because of recent updates
- FIXED: Issue where templates wouldn’t work if some core apps were deleted (like iPhoto, etc.)
- FIXED: Rare hang that could occur during simultaneous backup + changing encryption of folder
- FIXED: Possibly fixed issue encrypting folders outside of a FileVault encrypted Home directory, testing needed
Using Espionage With Microsoft Outlook

We’re happy to announce that with the release of Office 2011, Microsoft has fixed an issue that made encrypting Entourage data with Espionage difficult. Now, Entourage is replaced by a program called Outlook, and while there are technical reasons as to why we can’t include an application template for Outlook, you can encrypt Outlook’s data with Espionage. Below are the instructions:
Step 1 – Quit all open Office Programs and Microsoft Messenger
Before messing with an application’s data, make sure it’s not running!
Step 2 – Drag the “Microsoft User Data” folder onto Espionage
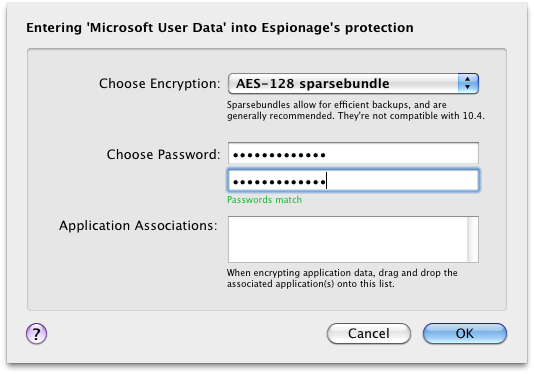
It’s located in:
/Users/[your username]/Documents/Microsoft User Data
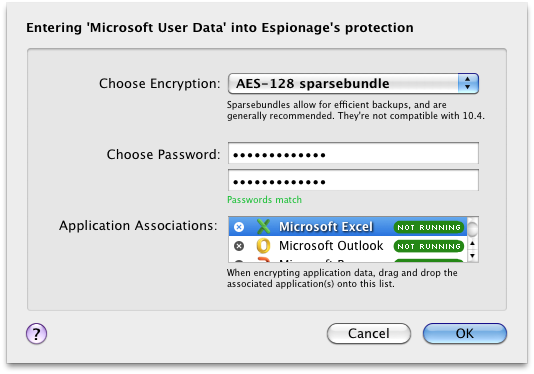
Step 3 – Associate this folder with *all* Office applications
Microsoft’s applications can access each others data, and because of this it makes more sense to just encrypt the entire Microsoft User Data folder instead of attempting to isolate individual folders (you’re welcome to try encrypting more specific folders, just make sure to keep backups).
So, the next step is to locate the Microsoft Office folder and drag all the applications in it onto the box near the bottom. If you use Microsoft Messenger, associate that as well (that will also keep your chat logs secured):
Step 4 (Optional) – Keep the folder unlocked while logged in
Since so many applications are associated with this folder, you might want to just have the folder remain unlocked while you are logged into your user account. You can do this by checking the Autounlock At Login checkbox for the folder (in Espionage), and also disabling the Lock On Quit checkbox by editing the application associations on the folder. If you choose to do this, just make sure to enable your screensaver password (in Apple’s Security System Preferences).
That’s It!
Your Office data and emails are now encrypted.
Enjoy! 😀